


Affordable Hobby House Greenhouse Instructions
!!!! CAUTION: Tubing ends may be sharp!!!
Step 1 – Ground Stakes
- Open all boxes and layout contents. Locate the stake driver; this is
used to drive the ground stakes into the ground. Next locate your ground stakes, they will be labeled. They are 1 5/8 x 5’ 3”.

- Next you must square the corner stakes with each other. Take all measurements on the outer edge of pipe (Figure 1.1). When you are squared lay a tape measure the length of the greenhouse on both sides. You should use a string (Figure 1.2): tie it to a ground stake and stretch it completely around all 4 corner stakes (make sure the string is pulled tight). Now you can mark the ground every 4 ft below the string. This is going to give you the 4 ft spacing for the ground stakes. Use the string to keep your ground stakes inline. The stakes should be driven in 24 inches if you damage them you can cut off the damaged portion (Figure 1.3).
- Drive Corner stakes and then drive rest of stakes on 4 ft. centers.
- The stakes should be approximately 24” below the ground. The section above ground will be the height of your sidewall.
NOTE: Images are examples, on this greenhouse your stakes will be 3½ feet tall.
Step 2 – Bow Assembly
- Place bow sections on flat ground (Figure 2.1).

- Slide sections together, and secure at joints with self-tapping screws (provided) (Figure 2.2).
- After bows have been assembled, raise upright and place ends in ground stakes to the reference mark (Figure 2.3). Insert till they stop at a sharp bend. Secure with tek screw.
NOTE: Bows are 2 or 3 pieces depending on your greenhouses’ size.
NOTE: Place swedged (crimped) ends on the same side of the Greenhouse. This will keep the bows even, and lined up. This may or may not be needed.
Step 4 – Purlins
- The straight purlin pipe sections connect together with self-tapping
tek screw. Place the purlin alongside the ground stakes insuring that one end is flush with the corner stake (not protruding past the stake), Figure 4.1. Take a sharpie and mark your purlin at the center of each ground stake(Figure 4.2). That way when you raise your purlin you just align the bow with reference mark on the purlin pipe. You will have proper spacing. The assembled purlin is attached to the first and last bow using a two hole strap(Figure 4.3). The purlin clamps are used on the remaining bows (Figure 4.4). Trim extra pipe off. Make sure to view illustrations.

NOTE: You will also install a purlin at approximately 10 and 2 o’clock for houses 24 ft. and wider.
NOTE: Wind braces are used on houses longer than 40 ft.
Step 5 – Base Boards
- Attach base boards (2 x 6 pressure-treated recommended) at the bottom
of the sidewall with 2-hole pipe straps or 6” carriage bolts. See Figure 5.1.

NOTE: Both fasteners work equally well, it is simply a matter of
personal preference. You must attach 2 hole strap to ground
stake using self-tapping screws also use wood screws (not included) to attach to your timber.
NOTE: For carriage bolts: drill through ground stake, bow, and 2 x 6 and install carriage bolt.
Step 6 – End Walls

- For Best results, we recommend the use of our End Wall Kits.
- Refer to Endwall Section of this manual, pages 4 - 5.
Step 7 – Wire Lock
NOTE: Not all houses use wire lock. Some use batten tape and staples.
- Attach the Wire Lock Channel on the first bow and last bow using tek
screws(included) every 18”. Refer to photos.
- Attach the Wire Lock Channel on either the hip or base boards (depending on whether you are using roll-up sides) all the way around the base of the greenhouse in the same manner using 1 ½” wood screws (not provided). TEK SCREWS ARENOT RECOMMENDED FOR THIS.
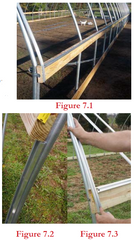
- If you do not have Roll Up Sides, start at the base board on one side. Attach Wire base on face of board (Figure 7.1) and install on bow running all the way over bow to other base board. Screw every 18” with self-tapping screws. If you have Roll Up Sides cut and fit a piece of wire base in between hip board and base board (Figure 7.2). Then attach wire base to face of hip board (Figure 7.3) and install over bow to other hip board.
- Once you have the wire base installed on first and last bows it is time to install it on the base board or hip board. If you do not have Roll Up Sides install wire base on the base board the length of your house. If you have Roll Up Sides run the wire base on your hip board the length of the house. Now it is time to install the wire base on the ends of your house. Wire base is only used on the base board you must cut to fit. End kit door opening vary in sizes so each end is different.
Step 8 – Film Installation
- When preparing to install film on your greenhouse be aware of the wind.
Try to pick a calm day. Start by locating the film for the ends of the greenhouse. Next gather 3 pieces of wiggle wire you will use this to hold film in place. Stretch the film over the bow and attach the film with the wire. You can adjust film by removing wiggle wire and reinstalling. Once end film is in place it is time for the main film. Roll main film out along side of the green house. Lay wiggle wire out around the house. Pull film across house and attach on one end. Go to the other end and pull tight. You may need to go back and adjust again. Once in place wire lock completely.

- Pull Film over the greenhouse (on a non-windy day!)
NOTE: Plastic normally has 12” or larger overhang on all sides.
- Lay film over the Wire Lock Channel, and fasten the plastic into the channel by placing the wiggle wire into the channel on top of the plastic (Figure 8.1).